01908 6998020845 899 4400 | 01908 699802Tel 01908 699802
3 Easy Steps to Perfect Mig Wire Feed Speed


Mig Welders are relatively simple pieces of equipment and are easy to use, the key is getting the machine set up correctly in the first place. Key to this is the setting the wire feed speed correctly.
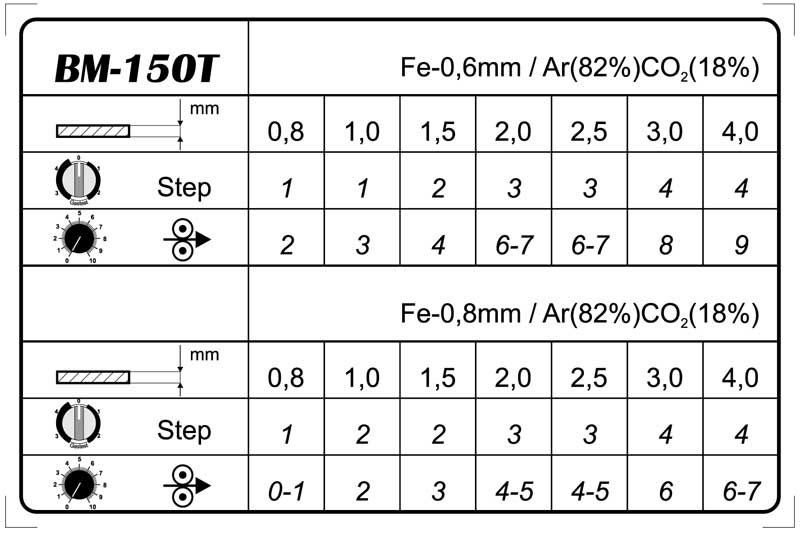
A lot of smaller machines on the market, BlueMig BM-150T for example, have a helpful Chart, indicating the settings most likely to suit a given thickness of metal with a given size of wire.
Example of Welding Chart
3 Steps to Perfect Wire Feed Speed
- Set the wire feed speed to a level that you know will be too high for the power output setting you’re using (this may be a best guess).
- Start an arc on a scrap piece of metal. With too much Wire the arc will “Stutter” and you will feel your torch bucking in your hand as the wire repeatedly hits the metal. If it doesn’t, increase the wire feed speed, whilst welding, until it does!
- Whilst maintaining this Stuttering Arc, SLOWLY reduce the wire feed speed. The Arc will suddenly run smoothly with an even “Crackle” and the torch will stop bucking in your hand.
CONGRATULATIONS, you now have the correct wire feed speed for the Power Output you’ve set on the machine and the size of wire you’re using.
Once you’ve got the setting right, it’s worth making a note of the setting for that wire and power output for future reference. Essentially, you start writing your own chart!!!
Conclusion
Getting the correct Wire Feed Speed on a Mig Welder is critical to getting a good quality weld.
Too much wire feed will generate a lot of spatter and a lack of penetration, not to mention a weld that looks like a line of Pigeon dropping 🙂
Too little wire feed will generate a weak flat weld, possibly with undercut.
Please let me know what you thought of this article by leaving a comment. Don’t worry, your email address won’t be added to a database or shared and you won’t receive any unsolicited email.
Cheers
Graham

Hi I’ve welded plenty of aluminum but not aluminum sheet metal I need to know a good amperage and wire speed for that type of aluminum.
Hi Wallace
Thanks for getting in touch.
The settings for the machine will depend on the thickness of the sheet and to a certain extent, the voltage for each of the output steps of your machine.
Best thing is to take your best guess at the output Voltage step and balance the wire feed against that.
Try a weld on some off cut of the Aluminum, than adjust Voltage up or down to suit. It’s not scientific, but it usually works out.
Hope that helps.
Regards Graham
I recently purchased an imig160 do you have any weld charts for this machine that I can use as a starting point please?
Hi Dave
Sorry, we don’t yet have a chart for the BlueMig 160 Synergic. As the machine has one knob control, it’s usually pretty easy to get the power right for any given joint. Charts are only ever a guide anyway as different weld configurations require different amounts of power. For expample, a Fillet Weld will typically need 10% more power thean a Butt Weld.
Apologies for not being able to help further at this time.
Cheers Graham
Excellent Tips welding for good while but these tips are idiot proof well done.
Thank You, Graham
Cool post, but my number one tip… you know you’ve got the fight fire feed speed cause the weld makes a sound like you’re frying bacon!