01908 6998020845 899 4400 | 01908 699802Tel 01908 699802
Setting up Oxy Acetylene Kit

Setting up Oxy Acetylene Kit is not rocket science, but it is important to do it correctly.
All the following also applies to Oxy Propane and Oxy Propylene Kits
Setting up Oxy Acetylene Kit – the basics
- Oxy Acetylene fittings consist of a concave Female sealing face on one component and a Male ball shaped sealing face on the other. A Nut clamps these faces together to form a gas tight seal.
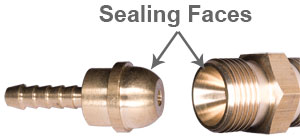
- Threads are not designed to be gas tight as gas will not come into contact with the threads.
- NEVER use PTFE tape or any other form of thread sealing product when setting up gas equipment.
- DO NOT over tighten joints, they only need to be nipped up, take special care if you’re using a large adjustable spanner as it’s easy to over tighten nuts if you’re using a spanner that was designed for use on the Forth Bridge assembly 🙂
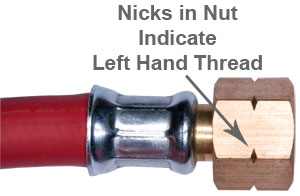
- Combustible Gas fittings (Propane, Acetylene etc) will be LEFT HAND THREADS, this will be indicated by little nicks in the corners off the nuts.
Setting up Oxy Acetylene Kit

- Visually check the inside of the thread and seat of the Gas Cylinder outlet, you’re looking for dust, debris or scratches on female sealing face.
- Fit the Gas Regulator to the Gas Cylinder
- Fit the Flash Arrestor to the Regulator – Note, in North America, Flash Arrestors are fitted to the Torch, but here in Europe we fit them to the Regulator.
- Fit The Hose to the Flash Arrestor. Note, it may be that both ends of your hose are the same size nut, allowing the hose to be fitted the wrong way round. The Torch end has a Check Valve (one way valve), if the hose is fitted the wrong way around, you will not get any gas out! Look at both ends of the hose, if the nuts are the same size, look behind the nut, if there is 5-10mm of brass bar between the back of the nut and the start of the hose, that will be the Check Valve and thus the Torch end of the hose.
- Fit your Gas Gun to the end of the Hose.
Setting Gas Pressures
- Check the valves on the Torch are closed.
- Check the Control Knobs on the Regulators are unscrewed to the point where they’re loose and a little floppy.
- SLOWLY open the Gas Cylinder Valves.
- Open the Torch Oxygen Valve 1/4 – 1/2 a turn (no gas will come out yet).
- Screw the Oxygen Regulator Control Knob Clockwise until you feel it start to go stiff. Continue turning while watching the Delivery Pressure Gauge on the Regulator. Continue turning the Regulator Control Knob until the desired pressure is reached.
- Turn OFF the Torch Valve.
- Repeat steps 4-6 with the fuel gas.
- Check all joints for leaks with a proprietary leak detector product.
Lighting Oxy Acetylene (or Propane/Polypropylene) Torch
- Imagine the Torch Gas Control Knob is the face of a clock. Open the fuel gas Torch Valve around 5 minutes.
- Light the gas with a Spark Lighter (Cigarette lighters should be avoided as they can be dangerous)
- Slowly open the Oxygen Torch Valve until the desired flame is achieved.
You’re now ready to get stuck into the job! Always remember to use eye protection, even if you choose not to wear darkened goggles, you should at least wear clear goggles, as there is always a risk of sparks.
Shutting off the Flame
When you’ve finished the job:
- Turn off the Fuel Gas
- Turn off the Oxygen
- Be careful where you put the Torch as it is likely to be hot
End of Work Shutdown of Kit
- Close the Cylinder Valves
- Open the Fuel Gas Valve on your Torch until the Gauges on your Regulator drop to Zero, then close the Torch Valve again
- Repeat step 2 with the Oxygen Torch Valve
- Unscrew the Control Knobs on the Regulators until they go loose and slightly floppy
I hope you found this blog article about setting up Oxy Acetylene Kit useful, if things work out well for you, please feel free to post some pictures of your achievements on our Facebook Page
View our range of Oxy Acetylene Kits
Please let me know what you thought of this article by leaving a comment. Don’t worry, your email address won’t be added to a database or shared and you won’t receive any unsolicited email.
Cheers
Graham

Thanks for this detailed yet clear explanation of an oxy acetylene set up. This helped me prep two of my guy for an upcoming civil servant exam.
Hi Bill
Glad you found the article useful. Best of luck to your two guys in their exam!
Cheers Graham
Thanks for the clear and concise article. I’m just wondering, what is the purpose of unscrewing the control knobs on the regulators at the end? I assumed I could just turn off the main cylinder valves – the gas should be shut off and the regulators will be set correctly, ready for the next job. Is this bad practice?
Hi Mike
Thank you for the comment, glad to hear you found the article easy to read!
In answer to your questions:
When the Control Knob is screwed down, a Spring is compressed inside the Regulator.
Keeping this spring compressed all the time will shorten the life of the Regulator, not by much, but……..
If the Control Knob is left screwed down after the cylinder is turned OFF. When the cylinder valve is opened again a rush of high(ish) pressure gas enters the delivery chamber. This will cause the Needle on the Delivery Gauge to whip round, potentially causing damage inside the gauge that prevents the needle from going back to Zero. Ever after the gauge will read incorrectly.
Less likely, but still possible, the sudden pressurisation of the delivery chamber, could burst the Diaphragm that’s part of the pressure control mechanism, rendering the regulator scrap.
I get that leaving the regulator control knob screwed down is more convenient, and in most cases won’t be an issue, but if damage is caused when the cylinder valve is opened, that damage would not be covered by warranty.
So unscrewing the Control Knob is not absolutely necessary, but is best practice.
Hope that helps.
Cheers Graham
hey Graham,
thanks for the infomation you share about oxy-acetylene kit. It’s really helpful and solves some questions lasting long in my mind especially which gas to shut off first while fininshing the work.
Hi Chuan-Fang
Thanks for the comment, good to hear you found my article about setting up Oxy Acetylene kit helpful.
Regards
Graham
Hi Graham, I am new to gas welding and i am a little confused as to the correct way to shut down the flame, some videos show shutting off the Oxygen first and then the fuel but you say turn off the fuel gas first. Is one way safer than the other?
Thanks Chris
Hi Chris
When I was taught at College (back in the middle ages 🙂 it was always Fuel Gas Off first.
The reason being, Oxygen blows the flame out and clears the Torch of Fuel Gas.
Shutting the Oxygen Off first means unburnt fuel gas in the torch can ignite, a Flashback!
Hope this helps
Cheers Graham
Hi Graham,
So helpful, and really comprehensive. Clearly WW are committed to a high level of customer support. Many thanks
Thanks Brian, we do our best 😀 Graham
Thanks for all the information as custom building a Map Gas / Oxygen welding set up. Cleanliness and fits will be adhered to and checked fo leaks. The valves arnt dial type, but I’m sure with careful regulating of each valve and marking the knobs, I’m hoping for some element of success.
Thanks for the positive comment Barry, glad you found the article useful.
Cheers Graham
Awesome help..thx.
Tutorial/training tool for workshop guys
Thanks for the comment, glad you found the article useful.
Cheers Graham