01908 6998020845 899 4400 | 01908 699802Tel 01908 699802
Setting up a Gas Regulator


How you use your Gas Regulator will have a direct impact on long term life and accuracy.
Incorrect use of a Gas Regulator and incorrect storage are the two most common reasons for Gas Regulator failure, or the delivery gauge becoming inaccurate.
Putting Gas Equipment together
When putting Gas Equipment together, including fitting the Gas Regulator onto the Cylinder, it’s important to:
NOT use any kind of thread sealer (ptfe tape etc). Gas Equipment threads do not seal at the thread and using thread sealer will most likely cause leaks and can be dangerous.
NOT to over tighten any of the fittings. Fittings only need to be nipped up with a short spanner. Heaving on a spanner, especially a long spanner, will almost certainly lead to damage of the sealing surface causing leaks.
I’ve written a separate article about Setting Up Gas Equipment
Setting Gas Delivery Pressure or Flow Rate
You should refer to your equipment for the amount of gas required to operate it.
Mig and Tig Welders will normally specify a Flow Rate in Litres Per Minute (LPM).
Gas Welding and Cutting Equipment will normally specify a Pressure in PSI or Bar.
When you first fit your Gas Regulator to the Cylinder the cylinder will obviously be OFF. The following list explains delivery Flow Rate/Pressure setting (if using two gases, do one gas at a time). Carry out procedure in a well ventilated area with no combustion sources if the gas is flammable.
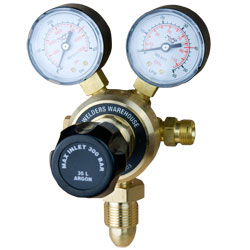
Ensure the Gas Regulator Control Knob (big Black Knob with Blue Cap in the picture), is unscrewed to the point where it is loose and floppy.
Slowly open the Cylinder Valve to turn the Gas ON. Note the Contents Gauge Needle pops up to show the pressure in the cylinder.
DO NOT open the Cylinder Valve with the Gas Regulator Control Knob screwed in as this may damage the Delivery Gauge. Manufacturers will not warranty replace parts damaged by this sort of incorrect use.
Open your Gas Torch Control Valve ½ turn (note no gas will come out at this time). If your setting gas flow on a Mig or Tig, operate the machine so it’s gas valve is open.
Slowly turn the Gas Regulator Control Knob clockwise. When you start to feel resistance the gas should start to flow and the Delivery Gauge Needle will start to move around the scale. Continue to turn the Control Knob until the desired Flow Rate/Pressure is reached.
Close the Gas Torch Valve or shut off the Mig/Tig Welder so gs no longer flows.
Note that when gas is no longer flowing the Delivery Gauge Needle will creep above the value set. This is quite normal and will go back down once gas starts to flow again.
Closing Down your Equipment for the Day
Closing down your equipment correctly is as important to its long term reliability and accuracy as the set up. Follow these simple steps (if using two gases, do the following for each gas separately):
Turn the Cylinder Valve OFF
Open your Gas Torch Control Valve or activate Mig/Tig Welder, so gas flows, note how the Delivery Gauge and Cylinder Contents Gauge Needles drop to Zero.
Unscrew the Gas Regulator Control Knob until it goes loose and floppy.
Close the torch Control Valve or deactivate the Mig/Tig Welder.
Storing Gas Regulator
If you don’t intend using your Gas Regulator for a Month or more, it’s a good idea to apply just a small amount of pressure to the internal valve, to stop it from sticking.
Do this by slowly screwing the Control Knob clockwise until you just feel resistance, then screw it one quarter turn further.
Remember to unscrew the Control Knob bar to loose and floppy before fitting to a pressurised gas cylinder.
Well I hope you found that informative and useful. More information on Gas Equipment can be found within this blog, or in our Knowledge Zone.
Please let me know what you thought of this article by leaving a comment. Don’t worry, your email address won’t be added to a database or shared and you won’t receive any unsolicited email.
Cheers
Graham

Thank you for sharing information about the LPG Gas Regulator with us. That’s so much valuable.
You’re welcome, glad you found the article useful.
Cheers
Graham
Hi,
I’m a rookie to welding with gas and bought a GCE regulator (£50) for fitting to a new gas bottle (ARGON MIX). My initial bottle pressure was only 165bar, not 200 bar and I was wondering how much of this variance might be attributed to the accuracy of the regulator.
Hi Barry
Lack of Regulator Gauge accuracy is possible, but unlikely, far more likely is the cylinder has been under filled, or has a small valve leak. I would go back to the cylinder supplier and take it up with them.
Regards Graham
Great info for us rookies. Will help to become competent with the equip.
Thanks for the comment Jon, glad you found the article useful.
Cheers Graham
What would the delivery pressure normall be with thee flow meter set to 7 litres per minute.
How many hours would a bottle last of 20 litres capacity at 3000 psi.
Hi Ron
I regret I don’t know the answer to the Delivery Pressure question as one usually uses Pressure OR Flow rate and you’re clearly using Flow Rate. Regarding how long a bottle would last. A 20 Litre Bottle filled to 200 bar (approx 3000 psi), would contain 4000 Litres (20 x 200). If your using 3 x 7 LPM, that’s 21 LPM, then it’s 4000/21 = 190 minutes (just over 3 hours).
Hope I’ve helped.
Graham
I find these articles extremely useful and informative. Keep up the good work Graham and co.